Extending the SXC9 order flow
February 25, 2019
- Sitecore
The default Sitecore eXperience Commerce order flow is quite generic and although it is not documented, it is possible to modify it. In this post I will share how to add a custom order state.
Default order flow
The out-of-the-box order flow looks like the following:
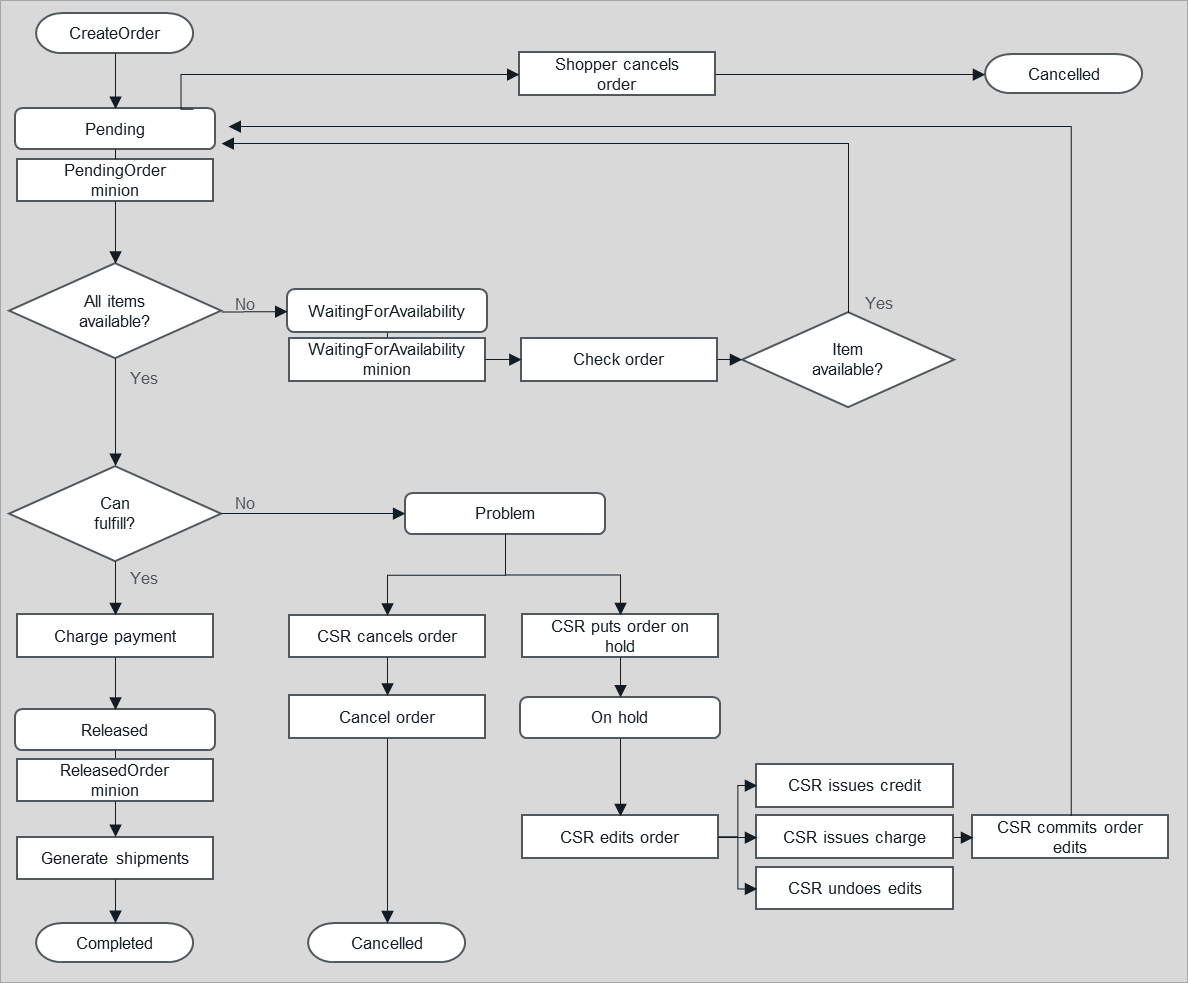
When you look closer at the order flow overview, you will notice these things called minions after almost each state transition. These minions are basically background jobs, that will periodically retrieve all orders in a certain state and fire a pipeline for every order in that state, optionally causing the order to transition to the next state. For example, there is a pending order minion that will periodically retrieve all orders in the pendings orders list and fire a pending orders minion pipeline. The blocks configured to run in this pipeline will validate the order and optionally transition it to the next state.
For contextual info on Minions and Pipelines, check out my previous blog post: Anatomy of a commerce plugin
This default order flow makes it perfectly suitable for an order flow based on federated payments. The payment is already validated during the checkout and during the Charge payment step the credit card gets charged. For one of our customers we were using a different payment flow in which the user is redirected to the payment provider after creating the order. The payment provider then asynchronously updates us with the payment feedback, similar to this Heidelpay SXC9 plugin example.
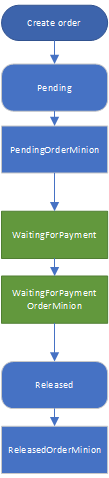
To make this explicit in our payment flow, we wanted to introduce an extra order state (WaitingForPayment): .
Break down
To add a new order state you will need to do the following:
- Extend existing pipeline with a block that transitions to the custom state
- Create a custom minion and pipeline
- Create custom block for transitioning from custom state to the next state
- Register state in business tools
Extend existing pipeline with a block that transitions to the custom state
Let’s open up a decompiler (I use dotpeek) and look a bit closer at how an order is transitioned to a new state. For example, check out the ReleaseOrderBlock in the IPendingOrdersMinionPipeline pipeline. Remember, the IPendingOrdersMinionPipeline is fired for every order in the Pending state by the PendingOrdersMinion. First we see that the ReleaseOrderBlock does some basic availability check and at the end of the block it transitions the order to the Released state:
      order.Status = policy1.Released;
      KnownOrderListsPolicy policy2 = context.GetPolicy<KnownOrderListsPolicy>();
      order.GetComponent<TransientListMembershipsComponent>().Memberships.Add(policy2.ReleasedOrders);
To set the state of the order it simply sets the State property to the desired value. It also adds the order to the ReleasedOrders list, which is important and results in the order being picked up by the Released Orders minion.
In order to have the order transition from Pending to WaitingForPayment, you will need to replace the above ReleaseOrdersBlock with a block that will move it to the WaitingForPayment state:
    [PipelineDisplayName("ExtendOrderFlow.block.MoveOrderToWaitingForPayment")]
    public class MoveOrderToWaitingForPayment : PipelineBlock<Order, Order, CommercePipelineExecutionContext>
    {
        public override Task<Order> Run(Order arg, CommercePipelineExecutionContext context)
        {
            KnownOrderStatusPolicy policy1 = context.GetPolicy<KnownOrderStatusPolicy>();
            if (!arg.Status.Equals(policy1.Pending, StringComparison.OrdinalIgnoreCase))
            {
                return Task.FromResult(arg);
            }

            arg.Status = "WaitingForPayment";
            arg.GetComponent<TransientListMembershipsComponent>().Memberships.Add("WaitingForPaymentOrders");
            return Task.FromResult(arg);
        }
    }
Add the following to ConfigureSitecore of your plugin to replace the ReleaseOrderBlock:
.ConfigurePipeline<IPendingOrdersMinionPipeline>(c =>
                        {
                            c.Replace<Sitecore.Commerce.Plugin.Orders.ReleaseOrderBlock, MoveOrderToWaitingForPayment>();
                        })
After this, when you create an order and run the PendingOrdersMinion minion using postman, the order should transition to the WaitingForPayment state. However, it will be stuck in that state, so we will need to introduce a custom minion.
Create a custom minion and pipeline
In the previous step we made sure the order gets the state WaitingForPayment and gets added to the WaitingForPaymentOrders list. Now we will create a minion that will run in the background and retrieve all orders in that list and fires a custom pipeline. For more detailed information on how to create a custom minion, checkout Akshay Sura’s excellent video.
Once again I’ve looked at the existing order minions and created the following minion:
    public class WaitingForPaymentOrdersMinion : Minion
    {
        protected IWaitingForPaymentOrderMinionPipeline MinionPipeline { get; set; }

        public override void Initialize(IServiceProvider serviceProvider, ILogger logger, MinionPolicy policy, CommerceEnvironment environment, CommerceContext globalContext)
        {
            base.Initialize(serviceProvider, logger, policy, environment, globalContext);
            this.MinionPipeline = serviceProvider.GetService<IWaitingForPaymentOrderMinionPipeline>();
        }

        [Obsolete("This method is deprecated, use Execute instead.")]
        public override Task<MinionRunResultsModel> Run()
        {
            throw new NotImplementedException();
        }

        protected override async Task<MinionRunResultsModel> Execute()
        {
            int itemsProcessed = 0;

            var orders = await GetListItems<Order>(Policy.ListToWatch, Policy.ItemsPerBatch).ConfigureAwait(false);

            foreach (Order order in orders)
            {
                CommerceContext commerceContext = new CommerceContext(Logger, MinionContext.TelemetryClient, null)
                {
                    Environment = Environment
                };

                CommercePipelineExecutionContextOptions executionContextOptions = new CommercePipelineExecutionContextOptions(commerceContext);

                await MinionPipeline.Run(order, executionContextOptions);

                itemsProcessed++;
            }

            return new MinionRunResultsModel
            {
                DidRun = true,
                ItemsProcessed = itemsProcessed
            };
        }
    }
This minion gets all the orders in the configured list and fires the IWaitingForPaymentOrderMinionPipeline pipeline for every order. To make sure that the minion runs, you will need to configure it in the Plugin.Minions.PolicySet-1.0.0.json file by adding:
      {
        "$type": "Sitecore.Commerce.Core.MinionPolicy, Sitecore.Commerce.Core",
        "WakeupInterval": "00:05:00",
        "ListToWatch": "WaitingForPaymentOrders",
        "FullyQualifiedName": "Plugin.ExtendOrderFlow.Minions.WaitingForPaymentOrdersMinion, Plugin.ExtendOrderFlow",
        "ItemsPerBatch": 10,
        "SleepBetweenBatches": 500,
        "Entities": {
          "$type": "System.Collections.Generic.List`1[[System.String, mscorlib]], mscorlib",
          "$values": [
            "Sitecore.Commerce.Plugin.Orders.Order, Sitecore.Commerce.Plugin.Orders"
          ]
        }
      }
The ListToWatch needs to correspond to the list that order has been added to.
Create custom block for transitioning from custom state to the next state
Now that we have the custom minion and custom pipeline, we will need to add a custom block similar to the first one, that will transition from the custom WaitinForPayment state to the Released state. Normally you would also want to add a validation block that checks if the order is allowed to go to the next state. For example, if the payment has not been received, you don’t want the order to transition to the Released state and you will need to abort the pipeline. Check the Heidelpay demo for an example.
    [PipelineDisplayName("ExtendOrderFlow.block.ReleaseOrderBlock")]
    public class ReleaseOrderBlock : PipelineBlock<Order, Order, CommercePipelineExecutionContext>
    {
        private readonly IPersistEntityPipeline persistEntityPipeline;
        private readonly IRemoveListEntitiesPipeline removeListEntitiesPipeline;

        public ReleaseOrderBlock(IPersistEntityPipeline persistEntityPipeline, IRemoveListEntitiesPipeline removeListEntitiesPipeline)
            : base(null)
        {
            this.persistEntityPipeline = persistEntityPipeline;
            this.removeListEntitiesPipeline = removeListEntitiesPipeline;
        }

        public override async Task<Order> Run(Order arg, CommercePipelineExecutionContext context)
        {
            KnownOrderStatusPolicy policy = context.GetPolicy<KnownOrderStatusPolicy>();

            arg.Status = policy.Released;

            KnownOrderListsPolicy listPolicy = context.GetPolicy<KnownOrderListsPolicy>();
            arg.GetComponent<TransientListMembershipsComponent>().Memberships.Add(listPolicy.ReleasedOrders);

            await removeListEntitiesPipeline.Run(new ListEntitiesArgument(new string[1]
            {
                arg.Id
            }, "WaitingForPaymentOrders"), context);

            await persistEntityPipeline.Run(new PersistEntityArgument(arg), context).ConfigureAwait(false);

            return arg;
        }
    }
Compared to the first block there are two difference: firstly the block also removes the order from the custom list, secondly it also persists the order. The reason we need to do that here is because in the default minion pipelines this is already done by a seperate pipeline block. For simplicity I’ve chosen to that in the same block.
Now we have everything to transition the order from our custom state to the Release state. The easiest way to test this, is by copying one of the run minion calls from the dev ops postman collection that is part of the SDK. In the body of the call change the fullname of the minion:
{
    "minionFullName":"Plugin.ExtendOrderFlow.Minions.WaitingForPaymentOrdersMinion, Plugin.ExtendOrderFlow",
    "environmentName": ""
}
After we run this and open up the bussiness tools, we should see that the order has transitioned to the Released state.
Register state in business tools
One thing you will notice though, is that your custom state is not displayed in the columns and filter of the order overview. To add it here, you will need to register the custom state by adding it to the OrderDashboardLists of the KnownOrderListsPolicy in your environment json:
            {
              "$type": "Sitecore.Commerce.Core.KeyValueString, Sitecore.Commerce.Core",
              "Key": "WaitingForPaymentOrders",
              "Value": "hourglass"
            },
Don’t forget to bootstrap your environment and after this you should see a column with the number of orders in that state and an option to filter on this state.
The complete example can be found on github.
Comments