• Catalog Import
  • Code
  • Commerce Server
  • Debug
  • Error
  • Msdbg
  • Production

Debugging dotnet production problems

This post described how you can debug difficult dotnet problems in production environments. To illustrate this I’ll describe how we solved a problem we had with Microsoft Commerce Server in production.

  • Design & Architecture
  • Rhino Security Linq-to-nhibernate

Filtering Linq to Nhibernate queries with Rhino Security

Rhino Security provides the ability to filter NHibernate queries based on permissions. To do this, an IAuthorizationService interface is provided, that can be used in the following way:

var criteria = DetachedCriteria.For<Company>();
AuthorizationService.AddPermissionsToQuery(currentUser.Value, "/Company/View", criteria);
return criteria.GetExecutableCriteria(Session).List<Company>();

  • Code
  • Convention over configuration
  • Design & Architecture

Convention over configuration

Ruby on rails makes heavily use of the Convention over configuration design paradigm. At the moment it is getting a hot topic in the .NET world too. If you are like me and are lazy and hate doing repetitive work, then you should really check it out, if you are not, you should check it out anyway. In my opinion, when properly applied, convention over configuration can save developers a lot of time and effort.

So what is convention over configuration? One of the best examples can be found in the Fluent Nhibernate project. This is a project that facilitates configuring Nhibernate, without the use of those horrible XML mapping files. One feature of this project is Automapping, which is convention over configuration in its purest form. I will just assume you are familiar with the Nhibernate mapping files, if not, you can read all about in the Nhibernate documentation.

Let’s say you have a domain entity Customer:

public class Customer
{
    public virtual int Id { get; private set; }
    public virtual string Name { get; set; }
}


And you would have your corresponding Nhibernate mapping file as we know it all too well:

<?xml version="1.0" encoding="utf-8" ?>
<hibernate-mapping xmlns="urn:nhibernate-mapping-2.0">
  <class name="NHibernate.Examples.Customer, NHibernate.Examples" table="Customer">
    <id name="Id" column="Id" type="Int">
      <generator class="identity" />
    </id>
    <property name="Name" column="Name" type="String" length="40"/>
  </class>
</hibernate-mapping>


I used to have mapping files like these all over the place. Writing these mapping files gets really boring and mistakes are easily made and hard to debug. The Automapping feature makes all of this a thing of the past. With Automapping it is possible to provide, for example a namespace, and automatically map all the entities in that namespace to a database. This mapping takes place based on conventions. One such convention can be that an entity’s property with the name Id always maps on an identity field named Id in the database. Or that a many to one relationship always maps on to a certain column. For example Order –> Customer automatically maps to the column Customer_id in the Order table. With the fluent nhibernate automapping it is also really easy to overwrite the default conventions by providing your own. Off course, this is not very useful when mapping to a legacy database, but in most of the green field Nhibernate projects it can be applied successfully. So in this case, in stead of configuring all of the mappings in XML files, we have certain conventions that allow Fluent nhibernate to assume entities are mapped to the database in the same consistent way.


Another good example of convention over configuration is the registration of services with an Inversion of Control container. In a lot of TDD based systems, there are loads of interfaces that only have one implementation. So why have to register all of these services one at the time? Why not just say to the container automap all services that fulfill a certain requirement, like being in a namespace or deriving from a certain base interface. Structuremap has this functionality out of the box. Unity doesn’t have this yet, but Derek Greer has created a Unity extensions to provide this, which he describes in this blog post.

So instead of doing this:

Container.RegisterType<ICategoryRepository, CategoryRepository>();
Container.RegisterType<ICustomerRepository, CustomerRepository>();
Container.RegisterType<IOrderRepository, OrderRepository>();

It allows you to do stuff like this:

Container
    .AddNewExtension<ConventionExtension>()
    .Using<IConventionExtension>()
    .Configure(x =>
                  {
                     x.Conventions.Add<ImplementationConvention<IRepository>>();
                     x.Assemblies.Add(Assembly.GetExecutingAssembly());
                   })
    .Register();

Which automatically maps all the services deriving from IRepository in the executing assembly. This can save you a lot of work, personally I always forget to add the service I made to the container. However, it also involves a lot of black magic. The wiring gets done under the hood, so how you debug a problem when something goes wrong? Well you will need some diagnostics. For example, it is possible to have Fluent Nhibernate spit out all the mapping xml file that are used under the hood, which makes it easy to debug. So when diagnostics are provided, convention over configuration can be really useful and is a welcome addition to my bag of tricks.

  • Acceptance based testing
  • Fitnesse
  • webtest
  • xpath

Xpath queries with Fitnesse webtest

As I wrote earlier, I’m using Fitnesse with the webtest driver to do acceptance based testing. Using webtest, it is really easy to write selenium based acceptance tests in a DSL way. However, the id’s that ASP.NET controls get assigned can get pretty ugly, especially when working with controls like the ASP.NET repeater.

When working with these controls, xpath can be really useful. To use xpath queries for looking up controls with webtest, you have to enclose the command that needs to use xpath with the following statements:

|Set locator lookup|false|

-- The statements that use xpath, for example:

|click|//input[Contains(@id, ‘ageSelector’)]|

|Set locator lookup|true|

By setting the locator lookup to false, it is possible to use xpath queries in stead of the normal lookup strategy used by Webtest (Ids, names or values).

When you are having trouble coming up with these xpath queries, then firebug really is your friend. It is possible to open up the firebug console and using a special command: $x(‘’) you can  then debug your commands:

image

  • Uncategorized

Screencasts Todo

Lately I’ve seen more and more screencast announcments pop by in my RSS reader, but unfortunately, the moment I see these, is not the moment I have the time to watch a 30 minute screencast. So I decided to make a list of screencasts I want to see when I have some time at hand.

Jeremy Miller - The joys and pains of a long lived codebase

http://www.infoq.com/presentations/Lessons-Learned-Jeremy-Miller

Eric Evans - on the state of Domain Driven Development

http://www.infoq.com/news/2009/06/eric-evans-interview-ddd

Udi Dahan - on SOA

http://www.vimeo.com/5022174

Greg Young – on DDD

http://www.vimeo.com/3171910

Eric Evans – on DDD: Strategic Design

http://www.infoq.com/presentations/strategic-design-evans

Eric Evans – on DDD: putting the model to work

http://www.infoq.com/presentations/model-to-work-evans

Tim McCarthy – on Framework and DDD: Keeping the Model Clean

http://www.infoq.com/presentations/Clean-Model-Tim-McCarthy

Dave Astels and Steven Baker – on RSpec and Behavior Driven Development

http://www.infoq.com/interviews/Dave-Astels-and-Steven-Baker

  • Acceptance testing
  • Design & Architecture
  • Fitnesse
  • General
  • Selenium
  • StoryTeller
  • Twist

Acceptance based testing tools

I really like the idea of having executable specifications. They can be used as requirements documentation and describe what your stakeholder expects from the software. Besides that, it is also useful as an indication of the progress being made by the development team. But what tools are there for automating acceptance tests?

Fitnesse

One of the most commonly used tools is Fitnesse. This is a wiki in which the tests can be described as tables. These tests can be described by the stakeholder and be mapped to test drivers that are created by the developers. A test driver is a mapping of the acceptance test to the code that needs to be tested, thus making the test executable.

There also is an extension to Fitnesse called Webtest. This actually is a generic test driver for mapping Fitnesse tests to Selenium scripts. If you are not familiar with Selenium, Selenium is a tool for testing web applications. For example, in c# a Selenium script looks like the following:

ISelenium sel = new DefaultSelenium(
"localhost", 4444, "*firefox", "http://www.google.com");
sel.Start();
sel.Open("http://www.google.com/");
sel.Type("q", "FitNesse");
sel.Click("btnG");
sel.WaitForPageToLoad("3000");

The webtest extension for Fitnesse allows you to write acceptance tests like the following:

image

The test can then be executed from within the browser, which results in:

image

So this is really cool, I really like the ability for the customer to open the tests via a browser and run the tests from the browser. But there are some things about Fitnesse that I don’t really like. As far as I know there is no source control integration and there is some friction in writing the test drivers. Writing the web tests is easy, but sometimes you need to test different functionality, which requires writing custom test drivers / fixtures. Some of these fixtures can become really cumbersome and complex. Besides that, I also think the tests still contain to much technical details. The organization of the tests (think test suites) and also the definition of the tests still contain technical details and are pretty fragile. The customer can easily break the tests. So overall, I really like the fitnesse approach, but there are some shortcomings. So are there any alternatives?

StoryTeller

StoryTeller is a replacement for Fitnesse. The first version of StoryTeller was based on the Fitnesse test engine, but the creator ran into a wall with the Fitnesse test engine. So he decided to reboot the StoryTeller project from scratch and created his own test engine. The progress looks promising, but the project is still very fresh. I’m eagerly following its progress, but to me it looks to immature to be used in a real live project at the moment. However, its creator Jeremy Miller, is a respectable member in the .NET community with an impressive track record, so I would definitely keep my eye on this one.

Twist

Thoughtworks offers a commercial product called Twist, which really is the way to go in my opinion. The user has it’s own user interface for defining the user stories in its purest form. The developers can then map these stories to executable tests from their own development environment. I really like the way this separates  concerns. However the product uses Eclipse as a host IDE and the test drivers can only be written in java, which is not an option to me. Now what to use?

What to use

In my opinion, Twist provides the best experience to the end user and makes it really easy for developers to write the test drivers. If twist were to be integrated into visual studio and provided the ability to write test drivers in .NET, I would probably go for Twist. Unfortunately, this is not the case.

I’m also really interested in which way StoryTeller is going. Jeremy Miller just released a sneak preview, but it does not provide any information about how the user will be defining the tests. I hope it will be anything like Twist.

For now, despite its shortcomings, I’m going to continue my work with Fitnesse, because it simply is the most widely used and mature tool out there.  However, I’m keeping my eyes open for alternatives. 

  • General
  • Test driven development
  • tfs
  • xunit

Integrate xUnit tests into your daily Team Build

Doing proper Test Driven Development with the default visual studio test runner (mstest) is like playing Gears of War 2 on an old fashioned tube television, it’s just wrong ;).. There are several alternatives out there like mbUnit and nUnit, but my favorite is xUnit. xUnit is heavily extensible and there is a project called xunitbddextensions, which extends xunit making it possible to do specication based testing (BDD). Using resharper or testdriven.net this makes for an excellent experience when developing in visual studio. xUnit tests can also be integrated into your daily TFS (Microsoft Team Foundation Server) build by using the xUnit build task. However, the details of the testresults are not displayed in the build overview and the results are not used in the reporting functionality of TFS (Like the Quality Indicators report).

On the xUnit site there is some discussion about this functionality, but at the moment there is no implementation. For nUnit there is a project on codeplex called nUnit for Team Build. This consists of a sample build script that uses an XSLT file to translate the xml results of nUnit into a visual studio test result file and publishes this result to TFS. This way integrating the nUnit test results into TFS.

I figured I could modify the XSLT file to translate the xUnit tests results instead. However, having a better look at the xUnit build task I noticed a NunitXml property, which makes it possible to output the xUnit results into a nUnit compatible xml file.  So I could just use the XSLT file and integrate the xUnit results into our TFS build.

To make this work I only had to modify the build script to use the xUnit build task instead of  the nUnit build task. This resulted in the following script (This just needs to be added to the end of your build definition):

<!-- Xunit Build task--><PropertyGroup><XunitBuildTaskPath>$(ProgramFiles)\MSBuild\Xunit\</XunitBuildTaskPath></PropertyGroup><UsingTask AssemblyFile="$(XunitBuildTaskPath)\xunit.runner.msbuild.dll"
    TaskName="Xunit.Runner.MSBuild.xunit"/><Target Name="AfterCompile"><!-- Create a Custom Build Step --><BuildStep TeamFoundationServerUrl="$(TeamFoundationServerUrl)" BuildUri="$(BuildUri)" Name="XUnitTestStep" Message="Running Xunit Tests"><Output TaskParameter="Id" PropertyName="XUnitStepId"/></BuildStep><CreateItem Include="$(OutDir)\*.Test.dll"><Output TaskParameter="Include" ItemName="TestAssemblies"/></CreateItem><!-- Run the tests --><xunit ContinueOnError="true" Assembly="@(TestAssemblies)" NUnitXml="$(OutDir)nunit_results.xml"><Output TaskParameter="ExitCode" PropertyName="XUnitResult"/></xunit><!-- Set the status of the buildstep in the build overview --><BuildStep Condition="'$(XUnitResult)'=='0'" TeamFoundationServerUrl="$(TeamFoundationServerUrl)" BuildUri="$(BuildUri)" Id="$(XUnitStepId)" Status="Succeeded"/><BuildStep Condition="'$(XUnitResult)'!='0'" TeamFoundationServerUrl="$(TeamFoundationServerUrl)" BuildUri="$(BuildUri)" Id="$(XUnitStepId)" Status="Failed"/><!-- Regardless of NUnit success/failure merge results into the build --><Exec Command="&quot;$(XunitBuildTaskPath)\nxslt3.exe&quot; &quot;$(OutDir)nunit_results.xml&quot; &quot;$(XunitBuildTaskPath)\nunit transform.xslt&quot; -o &quot;$(OutDir)xunit_results.trx&quot;"/><Exec Command="&quot;$(ProgramFiles)\Microsoft Visual Studio 9.0\Common7\IDE\mstest.exe&quot; /publish:$(TeamFoundationServerUrl) /publishbuild:&quot;$(BuildNumber)&quot; /publishresultsfile:&quot;$(OutDir)xunit_results.trx&quot; /teamproject:&quot;$(TeamProject)&quot; /platform:&quot;%(ConfigurationToBuild.PlatformToBuild)&quot; /flavor:&quot;%(ConfigurationToBuild.FlavorToBuild)&quot;"/><Error Condition="'$(XUnitResult)'!='0'" Text="XUnit Tests Failed"/></Target>

This script assumes you have copied the xunit  build task, the XSLT file and the nxslt3.exe file to a \MSBuild\Xunit\ folder under the program files folder on your build server.

Whether the tests fail or not, the resuls should always be published. However, the xUnit build task does not have an ExitCode and I could not find another way to get the result from the xUnit task. So I have modified the xUnit task to provide an ExitCode. Open up the xUnit code from codeplex. Locate the xunit.runner.msbuild project and open up the xUnit class. Add the following property and modify the Excute method to modify the value:

        [Output]
        publicint ExitCode { get; privateset; }

        publicoverridebool Execute()
        {
            try
            {
                string assemblyFilename = Assembly.GetMetadata("FullPath");

                if (WorkingFolder !=null)
                    Directory.SetCurrentDirectory(WorkingFolder);

                using (ExecutorWrapper wrapper =new ExecutorWrapper(assemblyFilename, ConfigFile, ShadowCopy))
                {
                    Log.LogMessage(MessageImportance.High, "xUnit.net MSBuild runner (xunit.dll version {0})", wrapper.XunitVersion);
                    Log.LogMessage(MessageImportance.High, "Test assembly: {0}", assemblyFilename);

                    IRunnerLogger logger =
                        TeamCity ? (IRunnerLogger)new TeamCityLogger(Log) :
                        Verbose ?new VerboseLogger(Log) :
                        new StandardLogger(Log);

                    List<IResultXmlTransform> transforms =new List<IResultXmlTransform>();

                    using (Stream htmlStream = ResourceStream("HTML.xslt"))
                    using (Stream nunitStream = ResourceStream("NUnitXml.xslt"))
                    {
                        if (Xml !=null)
                            transforms.Add(new NullTransformer(Xml.GetMetadata("FullPath")));
                        if (Html !=null)
                            transforms.Add(new XslStreamTransformer(htmlStream, Html.GetMetadata("FullPath"), "HTML"));
                        if (NUnitXml !=null)
                            transforms.Add(new XslStreamTransformer(nunitStream, NUnitXml.GetMetadata("FullPath"), "NUnit XML"));

                        TestRunner runner =new TestRunner(wrapper, logger);
                        if(runner.RunAssembly(transforms) == TestRunnerResult.Failed)
                        {
                            ExitCode =-1;
                            returnfalse;   
                        }

                        ExitCode =0;
                        returntrue;
                    }
                }
            }
            catch (Exception ex)
            {
                Exception e = ex;

                while (e !=null)
                {
                    Log.LogError(e.GetType().FullName +": "+ e.Message);

                    foreach (string stackLine in e.StackTrace.Split(new[] { "\r\n" }, StringSplitOptions.RemoveEmptyEntries))
                        Log.LogError(stackLine);

                    e = e.InnerException;
                }

                ExitCode =-1;

                returnfalse;
            }
        }

Now build the project and deploy the xUnit build task to the server. To realize the xUnit build integration just follow the steps you find on the nunit4teambuild site and use the previous mentioned modifications. After this, you should be set to go.

BTW: In the nunit4teambuild they use nxslt2, I used nxslt3. So depending on which one you use, modify the script accordingly.

  • Domain driven design

State based Domain Entities (State pattern)

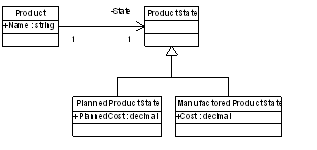
This post is actually just about bringing the state pattern into practice. At my current project, we have some entities that are based on state, which are forcing us to use some not so elegant mechanisms for change their state. I will try to explain this with the following example:

So there is a Product that can either be a PlannedProduct or a ManufactoredProduct. Now let’s say our business domain tells us that there is some transition from a PlannedProduct to a ManufactoredProduct. With the above model you would have to convert the entities, because you cannot just change the inheritance type at runtime. In case you are persisting the domain, you would also have to write code to delete the old entity and save the newly created entity, using NHibernate this code would probably look like the following:

ManufactoredProduct manufactoredProduct = ProductConverter.Convert< ManufactoredProduct>(plannedProduct);

NHibernateSession.Delete(plannedProduct);

NHibernateSession.Flush();

NHibernateSession.SaveOrUpdate(manufactoredProduct);

NHibernateSession.Flush();

The double flush is needed if you have some unique constraints on the product fields. As you would probably agree, not the most elegant solution. Here comes the state pattern. Wikipedia mentions that the State pattern provides a clean way for an object to change its type at runtime. Here is the refactored model:


Now if we would want to change the product type we would just have to assign a new ManufactoredProductState to its State property, no conversion needed. Though, we would still have to delete the previous PlannedProductState entity, but without the strange double flush constructions.

So to conclude, now burning water here. You’ve probably all been using the state pattern this way for ages. For me it was the first time using the state pattern in this way, before I’ve used it solely for separating behavior based on state. I thought it was a nice improvement to our code and wanted to write it down as a reference.